ok, im in. just posting to make sure i do some work.
all i know is ill be making a female character, and she may or may not have a weapon :)
Good job man, I'm liking the paint over -- reminds me of costume design from Marko Djurdjevic's tribal sketches.
Although the body anatomy is good, proportionally it looks awkward. Kind of like there's no room for things like the tapering of the ribcage, or the shoulder blades are collapsed inwards. Same awkward feeling with the head; certain elements detract from what the eye is used to percieving as basic feminine curves (normal ones, not over-sexualised ones). I'd suggest you get some three-quarter view referance and camera match your model against it to check things like how far back cheekbones go compared to the eyes and eyebrow ridge etc. I'm not sure on the breasts since it's hard to tell without a side view, but you may just be compensating for them sitting within clothing (which is great), so I'll stay away from commenting there. The hands are great, very nice form.
Neffy, i had something like this in mind for the footwear
http://i32.photobucket.com/albums/d3/shika01/e8a52785.jpg
new head is coming soon
http://i32.photobucket.com/albums/d3/shika01/dceaf01c.jpg
thanks peeps
EIN, critique noted for when i get back to work on the body :)
the model is about 300k at the moment, my computer isnt great so ive had to be really stingy. for example the body out of zbrush is only subd level 2 and most of the simple objects arent subdivided.
heres a screen grab :)
[img]http://i32.photobucket.com/albums/d3/shika01/screenie.jpg[/img]
quote:Originally posted by PeterDavis
another member of the highpoly before lowpoly party? looking good.
yep, ive tried both ways before and prefer this method. polyboost and snap to face toggle are my friends
ill consider posting on cgtalk, couldnt hurt. most of the responses to those plugged threads are pretty mindless
- David
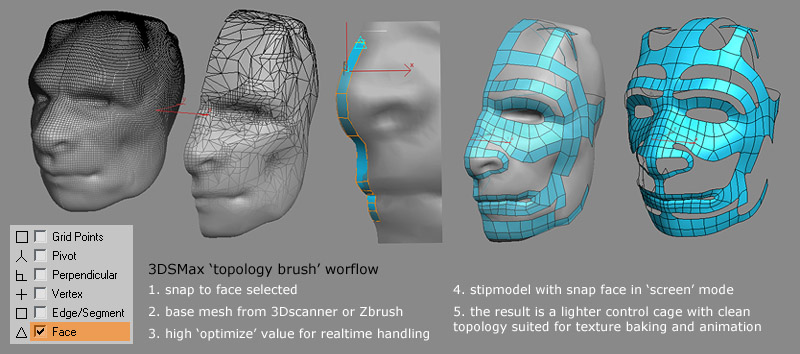
well if you use max youve probably used the snap toggle tool before, just set it to snap to face and that will enable you to extrude edges that conform to your high poly.
ill borrow this example from pior
http://www.pioroberson.com/images/minitut_topology_worflow.jpg
[url="http://www.polyboost.com/"]polyboost[/url] is a plugin for max that speeds up this process 10x, as well as doing a whole bunch of other cool things
-David
hrm. im still finding trouble seeing the advantages, but ill guess ill have to try it later. I can see it being better if you start in Zbrush, but since i dont own it and after trying in the demo and finding myself utterly confused with the program, my roots remain in sub-d modelling. ive always found it simpler and more logical to make a low poly with solid topology, then sub divide and sculpt the low poly and then go back to the low poly to make sure its all consistent. thats what i did for my challenge entry anyway.
so basically you are extruding edges along the surface of the highpoly? sounds handy enough.
oh, and polyboost looks fantastic, thanks for the heads up.
obviously im limited somewhat without zbrush, but as long as the results are as impressive as anyone elses im happy. however its always good to get some insight into alternative workflows. I experimented with a new modelling method (new for me, anyway) and found it far less daunting.
updates?
p.s sorry about huge post ;)
i guess the end result is all that counts :)
zbrush is worth the effort it takes to get over the confusing UI, its so damn fun.
i dont know of a maya equivalent silvermirage (cause i dont know maya), but im sure there's a maya savvy chap on these forums that could share some wisdom via PM.
updates soon
- David
ended up making a totally new head, started with a nicer base mesh this time.
http://i32.photobucket.com/albums/d3/shika01/312cf840.jpg
some other ideas for hair
http://i32.photobucket.com/albums/d3/shika01/93ea151d.jpg
- David
Man this model is definately coming along real well. I like the hair you've got in the full body render, IMO it just seems to suit the character more than the others. The face came out great as well!
You're definately pushing the quality of work in this comp, which is great because it takes this challenge up a notch and forces others to put some to push themselves further to compete with you! Especially myself!
Keep it up!
-caseyjones
thanks CJ, im glad you feel that way :)
i decided to go with the dreads, the hair is a low subD level version of the one ive got in zbrush
[img]http://i32.photobucket.com/albums/d3/shika01/99bf4169.jpg[/img]
here's the lowpoly, ill duplicate some of the hair pieces after ive rendered the normal map
[img]http://i32.photobucket.com/albums/d3/shika01/5e708a2d.jpg[/img]
- David
Great work dude!
A quick question for you, as you seem to know your way around ZBrush. You started with a naked body mesh then added the clothing later. Are you bringing the naked body back into ZBrush with the added clothing attached then sub dividing and detailing as you go? Or are you just bringing in the clothing on their own and detailing then exporting it back into Max/Maya/etc and just placing back over the top of the model.
I wasn't sure how to go about it with my model, because I want to work on certain parts of the model at one time then go from there. Or should I just bring in the whole low base mesh then mask out the bits I want to work on and do it that way?
Hopefully that made sense (because my previous post didn't) :/
-caseyjones
after subD modelling the gear in max, i export it all as a single OBJ file, but keep everything as seperate objects, that way i can use the handy hide by object shortcut(shift + ctrl) that makes working on overlapping gear easy as pie, and make sure everything still fits together after zbrushing
after that i exported just the pieces that had work done on them and imported them into hidden layers in max to save memory on my poor computer.
you could do something similar with your character and seperate the arms/legs/head/torso and just hide the bits that you're not working on in zbrush.
- David
no concept yet cause i dont have a scanner :(
http://i32.photobucket.com/albums/d3/shika01/f491098f.jpg
edit: heres a quick and crappy paint-over
http://i32.photobucket.com/albums/d3/shika01/b529849e.jpg