Description
Show and discuss progress on anything here for feedback (upload finished work to your journals)
Show and discuss progress on anything here for feedback (upload finished work to your journals)
Based on the Halo universe, this is a creature for my teams Halo Custom Edition single player mod. First thing I've ever actually done totally myself. Concept, Models, UV mapping and textures done in 3Ds Max, Mudbox, bodypaint 3D and Photoshop. Not calling it done yet though, any thoughts?
These were created for my teams Halo Custom Edition spr mod. Though mostly based on the Halo 3 versions, the models were sort of focused on a look between halo 1 and Halo 3. I redesigned most of the texture details just to give it a difference.
Models by Teh Lag, uv mapping and textures by me.
I used Photoshop and Bodypaint 3D to create a greyscale height map and then converted it to a normal map for the details and then used the normal map and height map to create the diffuse maps.
I used a cubemap exported from ingame and masked it with the specular's alpha channel to get a nice reflective look to the armour.
Ok this is my latest piece its a Tank... kinda, no guns tho.... anyway its for a game my class is making at AIE melb, its sort of steampunk, but this piece is supposed to be slightly more advanced then the usual steampunk image.
Its 2012 polys done in maya textured in photoshop CS2
It was orginally 2 seperate vehicles concepted by myself and another in my class, we each only liked the front of one and the back of the other so i merged em together and this is the final result
Enjoy
Kit11 =)
once again all feedback is welcomed, this is my first vehicle.
He's a seedy pale preacher, one of those "god bless satan!" kind of guys. This is for the Total Conversion mod for UT3, WarmGun.
Model and uv's by an artist on the team. Textures are by myself, painted in Photoshop and tweaking in Bodypaint 3D.
I rendered the model with ambient occlusion so the normal map has been nulled a bit, but god dam I love the sexiness aocc provides.
A low res of the diffuse
He wields these dual revolvers, the revolvers are modeled by a guy on the team called Phaeton, the uv mapping and texture painting is me.
Also, a shot of the right first person arm, just started it, so it's a bit sketchy:
Crits welcome :)
No one has ANY opinions they wanna share? I won't bite if you think its shit, just tell me what specifically.
also, update:
Seriously, any crits I openly welcome.
Dane Brennand - Texture Artist
Your update fixed up the one criticism i had from the non-artist perspective, the peacher "white" thing looked like it was just sitting there, now its blended in better.
The clothing under the arm looks very semetically rounded. Aka I could imagine if he lifted his arms it could get stuck at the moment, aka very tight. The pant endings look like they are wings, seem very rigid.
Face looks good from my perspective, looks realistic. Texturing on the top looks realistic.
Sure others with a art background can crticise/praise appriopriately though.
Thanks man. Just to clear things up though, the body is modeled in a rigged state so the rigging and animating people have more geometry to work with. In the game the coat tails would actually be handled by physics, so they'd hang loose and swing around as you moved.
I also agree with you on the arms, the modeler on the team could have done those a bit better.
Dane Brennand - Texture Artist
Would they use cloth animation in the in-game physics for the coat tails? Or would the coat tails be done using traditional animation?
It would be set up with nodes and handled by the Physx engine in UT3.
Dane Brennand - Texture Artist
awsome character, great concept
could be tidied up in a few places, but overall great job
Looking good. Post a money shot when you get him all rigged up.
P.S. - I Love the evil looking pistol.
id hit that :P na tis awsome model I do think that theres something wrong with the chin maybe it's just annoying me :P
Hey this is the first model I've worked on in a long time, I really appreciate any comments / criticism
Ok, criticism. It's fairly self explanatory. The proportions are way off, it does vaguely resemble a female character, but to be quite blunt here, I'd restart the whole thing. You probably know that though.
Also, what on earth are you doing modeling in mudbox from scratch like that. IF your planning on putting that in an engine, good luck. Model in something else first, then export that model as a .obj to mudbox and sculpt a hi poly, then bake it to a normal map and get some nice stuff happening.
Wow, pretty rough, I didnt model it in mudbox from scratch, it was modelled in 3ds max, and that was exported as an obj, and this will be baked to a normal map... You know, WIP for a reason...
How about providing some constructive criticism rather than just "Its shit start again." And
I'm interested in hearing what proportions are way off because it was modelled off reference images.
From a non-artist perspective, the body looks about right, the face looks off though..
It looks more "robot"ish. I think its more the chin area, where it recedes in so much.
Whoa, calm down. Your words not mine.
And the proportions are wrong. That shouldn't be debatable. Unless you modeled the reference off an out of proportion woman.
I said start again, because it would be much quicker to do as such, rather than aimlessly trying to fix what you have.
Also, I thought it was modeled from a mudbox sphere because the character looks too primitive and hasn't got much definition. That is not said in offense, that is a notable observation on my part.
Just.....leave it for a week, and come back look at it objectively, not subjectively. You'll see what I mean.
Seriously, if you blew up at THAT remark, you've got little hope of improving. I went easy on you o_o
Dane Brennand - Texture Artist
Maybe you can show us your side / front photo reference you used in your viewports so we can have a geezer ?
It is hard to tell without a front and side view i could do alot more redlines for you. So ill just have to go by what looks wrong.
The breasts are shaped strangely and look weightless, you can fix this by making them more round towards the bottom of where they sit and more graduall from the top.
her clavicle angles down very sharply it should be more straight and the line that connects the breast to the arm should continue up to form that shoulder muscle. It almost looks like she dosen't have a ribcage either, and her hands seem to large.
Her groin to belly button area looks pretty short it should be almost 1 head length atm it looks like half a head. Getting the proportions of a body correctly relies completely on the head size, get it in there asap.
from the knees down looks like the wrong shape but with out side and front I cant suggest what to do to fix it.
You have done a nice job on the lips and nose and i find them the hardest.
First off i shortened it vertically it seems really stretched beforehand. The cheek juts out in a very strange shape and she looks like shes frowning (maybe intentional). Theres no skull or area at the back of her head for a brain to sit in XD and the jaw line seems unrefined atm. Yellow lines are spots I found strange bumps in. Need an eyeball then you can shape the eye correctly :)
Yeh thanks for the comments everyone, really appreciated, ill work on it a bit more and give you an update one day.
Some ppl are just bastards. I can see its good and your not done, because i can see what it could look like textured, and ears added etc and it will look good. Some of what they say is correct but some is also the unique look you want, otherwise everyone that follows the "this is how you should do it" is gonna churn out the same boring bimbo's.
it's pretty good seeing as you have not modeling in some time, but I would have to agree with a few of the comments, your proportions a off, you can easly fix them up in max then go and try again in mudbox, the next try will look better...practise make perfect ^^
http://www.greatgamesexperiment.com/game/metacraft
I have a friend who has been developing this game for about a year now. Its a 2D sidescroller, where you play a mage. Spells are constructed using a node based editor, where each node is some sort of component of the spell. Mana runs through the connected components like water, activating them and casting the spell.
The screenshots in the link are pretty old at this point, but it gives you the gist of it.
The game is in a constant state of flux, but the goal is to create a simulated world which can be manipulated through the spell system. The simulation includes basic chemical simulation (water+heat = steam stuff), physics simulation and the magic system itself.
The goal is to create emergent gameplay via the massive number of spells which can be created. The game will be single player only (though we have considered how to extend it into multiplayer, its the technology that is the limitation here), and will probably consist of solving physics puzzles.
Rather new to webhosting so I'm not sure how to post a picture on here yet.
Yeah I know hes not really a game model but hes my Finished artwork
Took me around 2 weeks to create, rig, texture, light and render.
Finished modeling this a few weeks but have had trouble rigging and animating in maya, (used max last year) but hopefully soon ill have it all posed up =)
Ok, I'm not sure if you were aiming for a characture, but It's came out looking very out of proportion.
Ok, the nitty gritty:
You poly distribution is terrible, more importantly around the face, and the model is incredibly subdivided for it's silhouette. 7000+ is by no means epically gigantic these days, but for a character of that detail, you could have gotten around 1500 triangles at least.
The textures need to be pushed further than photosourcing and slapping basic mats down.
I'm going to jump ahead here and assume this is one of your first bipeds. If so, it's pretty decent as a finished product, but you really do need to just keep making more stuff and push yourself further.
Thanx for the comments yeah its only my 3rd finished character and my 1st one in maya. Im not much of a drawer, which is why its probably out of proportion. Thank you for your honesty, ive been studying at AIE melb and they seem more interested in the money im paying then actually helping and giving advice on how to do things properly, hopefully over this next modeling challenge i can post some WIP and pick up a lot of tips from the more experienced people on this forum =)
do you know of any good tutorials i could look at for game characters??
once again thank you for the honesty
Hey Brad, its me Cody from lasts years class:) How are you? Hope AIE is going good..... Anyways, nice job on the character, espically when its only the 3rd one u have completed. I am assuming you already know where the flaws in this model are, mainly the poly flow and distribution. You could of easily got the same result with a lot less tris. Search through the net next time and try find some good orthos and squish and squash your own to try match the correct ones.
The textures don't fit eachother, you have photosourced pants and it seems to be hand painted textures for the other parts and of the model. Keep consitency with the model, look at other models similar to the one you are creating and understand how they modeled a certain area or how they achieved that texture.
Looking good though man, keep it up, best of luck at AIE....
www.poopinmymouth.com is a very good resource, i pretty much self taught myself of that website, give it a go:) PS: Do you have MSN? If so add me, codyalday@hotmail.com
Hey cody, yeah im not bad trying to keep everything moving along for the course while working to try pay for it lol.
Yeah the texturing was a kinda rush job to get it done, i might re-texture it yet.
MSN is ork_11@hotmail.com ill add ya when i get home
Yeah dude, tbh those institutions are a total load of shit and are just there to push paper and keep people in jobs. If you really want to get good at 3d or game art, really devote yourself to learning, and apply for mod teams, get experience with other people and really develop further.
90 percent of the big game companies don't care at all about degrees and certificates, hell, I know a guy I used to work in a mod team with who's now working at epic games as a hard surface modeller, had no qualifications other than his high school diploma.
Also, get registered at some forums.
www.polycount.com is probably the best. Pro game devs from all sorts of studios, bungie, epic, rockstar, raven, loads of em go there and share work and critiques. Hang around there long enough and work hard enough and you'll start developing a higher standard of work, and maybe meet some people if they like your style and think you have promise.
Dane Brennand - Texture Artist
Think you mis-understand what 3dbuzz is, its just a bunch of training videos not a "certificate" place.
Oh they sell some DVDs for training videos for like $50, but the majority of them are free, just youtube style flash video with training on various stuff.
Have friends taking 2nd year programming, whoare experiencing similar experience on "taking money and let you defend for yourself" type feeling.
Aka they seem to be learning more from doing their own stuff than doing AIE related projects. I try to help em out at times as well when I can (bit tricky working full time as a programmer myself though)
I wasn't responding to your post, otherwise I'd have quoted it. I was talking about the AIE being a load of shit, obviously.
Dane Brennand - Texture Artist
Hey, first off I'd like to introduce myself as a gamer trying to get into the industry. Anyway I was directed to this site by some presenters during a gaming convention in Brisbane (Gencon) and so here I am displaying some ideas of mine.
Alrighty:
The game Rising Sun's concept is basically about a competion martial artist attempting to enjoy a holiday in Japan after being defeated in a major tournament, however he/she (the character can be chosen amongst a series of avatars by the player) is instead caught in a desperate country-wide event held by an 'out-of-luck' event organizer. The player must travel the country of Japan, combating competition entrants and other opponants as they venture to shrines, the only safe haven where they wont be attacked. The aim of the competition for the player is to visit, and gain proof of visiting, each shrine in Japan without being defeated by any assailant. It's kind of Pokemon (in that there are 'trainers' competing against each other), meets Seven Samurai (a group of people against an entire army), meets Journey to the West (a long journey to complete a task with a series of adventures during the journey).
The game is intended to serve as a kind of tourism gimmick. Displaying many aspects of Japanese way-of-life, history, mystism and other such things such as popular sites and themes. The intention is such that the game can turn into a game series (Rising Sun featuring Japan, another game featuring Austalia, another game featuring Britain, etc) but for now lets just focus on Rising Sun and Japan.
The combat system would be similar to those seen in Kingdom Hearts and Jade Empire in that it is platform based with a hint of RPG. The main character can, through certain relationship aspects, gain 'party members' who can assist in defending or fighting against the assailants. Of course these party members will also offer side-quests and represent various Japanese stereotype characters (eg,Samurai Girl, ninja, otaku, etc) and side-stories.
I may post some concept sketches of characters and items up later as well as a little story that covers the protagonist's final 'side-battle' against the combatant that had defeated them at the beginning of the game. Any thoughts?
So I finally got this finished.
5451 polygons and a 1024*1024 Diffuse, Normal and spec maps.
*edit* Again this HTML malarky has foiled me... Can't get more than one image in the post at a time.
Hi all, I thought I might upload my latest project.
The design is based on the real Beale St appartment. Everything was created by me in 3DS MAX 2008 (some elements we're downloaded from turbosquid) and rendered using mental ray.
Crits and comments very welcome ;) Be gentle though, this was my first architectural project ever.
Heya everyone,
It's a bit quite around here, but it wont pick up if people don't post - so I'm gonna post. Thought I'd share a few screenshots from a deathmatch level I am working on in Unreal Tournament 3. I've still got a fair amount of work to do, such as interiors for the buildings, more foliage, general touchups, and maybe even some mine shafts below the surface.
Let me know what you think,
Cheers!
Looking good mate. Mine shafts sound awesome, and will add a new level of game play and variety to the level.
Watch out for texture tiling especially on the buildings.
Cant wait to see the finished level.
Looks pretty cool, mate. You know, I haven't played Unreal 3 or looked into user generated content since, well, getting bored of it a week after I got it near release day. How's the map and modding community behind it going?
Heh, yeah I don't blame you for getting bored of it quickly - it's been done before. I pretty much bought the game for the mapping/modding aspect, and have only really played the game to get a feel for how it works and to assess the standard of work from Epic that I have to try and meet. The community behind it is actually pretty good. http://forums.beyondunreal.com/ is useful and Hourences is an encyclopedia when it comes to the Unreal editor. He also has his own site with some helpful tutorials - http://www.hourences.com/book/index.htm
I like this map man ^^ looks very sweet, i'll have to play around with the unreal III engine some time but in the mean time it's QW for me ^^
Just finished modeling my first 3d couch - gonna make a whole collection of furniture.
It isn't textured yet.
Edit:
Just made a coffee table to go with it - not textured yet either.
Edit 2:
Haven't up'd the poly count on the couch yet, just made some more stuff to go with it.
Edit 3:
Added a bookshelf. I wanna add some plants and decorative pieces, like vases and a rug or something next.
Solid start Angel, a few things you might want to look at:
on the coffee table it looks like the outer edges are perfectly cut. For more realism you might want to add a small chamfer, even 1mm will take the sharp edge off (i wouldn't want to catch my leg on those corners).
Are you limited by the number of poly's u can use? If not, you might want to add more to the curves on the sofa for a more smoother appearance.
Good work.
Solid start Angel, they should look awesome once textured. A few things I noticed:
The corners on the coffee table look very sharp, you could add a chamfer, even 1mm would do (those corners look deadly).
Are you limited by the number of poly's you can use? If not, you could think about adding more to the smoothing of the sofa to reduce the number of flat faces on the curves of the cushions and back rest.
Good work.
Thanks heaps threedninja :)
I'll chamfer the coffee table and smooth out the sofa a bit - I don't really have any poly limits, it's just for fun. Show you the results soon.
So, I haven't added more polys to the sofa, but I did chamfer the coffee table, made some side tables and lamps, added some walls/roof + lights, plus the insets with lights on the wall. Still untextured - after I'm done with having some modeling fun, my BF's gonna teach me to UV, then to do the whole texturing thing.. so til then!
Hi Angel,
Those changes look great, a few things to consider; add some bump maps to all of your materials (even a flat painted wall still has the roller marks and imperfections in the wall). Bump maps help to add inexpensive realism to your 3D models.
Add in any props that make the room looked lived in, that a human is/was in the room. Maybe put a coffee mug on the table with a couple of magazines. A painting on the wall, a few nick knacks on the shelving units. The sky is the limit really. Try a google image search for interior design display rooms to get inspiration for your props.
Decided to keep working on my modelling comp entry. Slowly getting there, most of the high poly is done now. Just need to work on some of the accessories.
Hmm, can't get images to work. Help.
*edit* fixed, thanks John.
Souri tipped me off on how to get image to show in posts, here is his wisdom:
-----
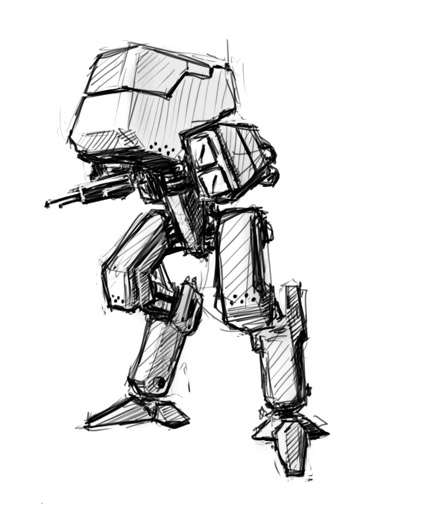
(img src=http://img135.imageshack.us/img135/9176/mech5fa0.jpg)
Use < and > instead of the curly brackets
-----
modeling looks good.
Ok, getting there.
The low poly and the UV's are done and sitting at 5451 tris.
Working on the diffuse texture at the moment, the leather work needs some wear and tear on the edges to make things pop. Then I can work out the skin.
I've been developing icons at work recently and doing a little R&D in my own time too - thought I might post a little of the personal progress, it's a fair change from the type of stuff I usually post. The icons are created in illustrator. I expect final icons will be cleaned up in Photoshop before being called finished.
Apr4th--
Some progress with the icons, I am still modifying the process and have already planned trying some new variations.
June21--
A few more addition to the collection
June22--
I decided to upload a few more samples (see initial post). These are very close in look to what I am producing for a mobile interface I'm currently working on.
The yellow, diamond thing. No idea what it is or what it represents - needs to provide immediate visual feedback about what it might do, ie more descriptive of its function.
I would also play around with the angles, so you are seeing the icons more straight on. Try an angle of about %5 and post those for comparison?
Thanks for the comments LaughingStock. Everything i have posted in this thread is experimental rather than actual icons (or WIPs). The yellow diamond thingy is not of anything, just an experiment in style and procedure. Hope that clarifies things.
The latest additions of emoticons really are very close to the icons I am producing at work (I exaggerated a little with the last post saying they were 'very close' to the actual items). They are also about the size the icons with this treatment will appear in the application.
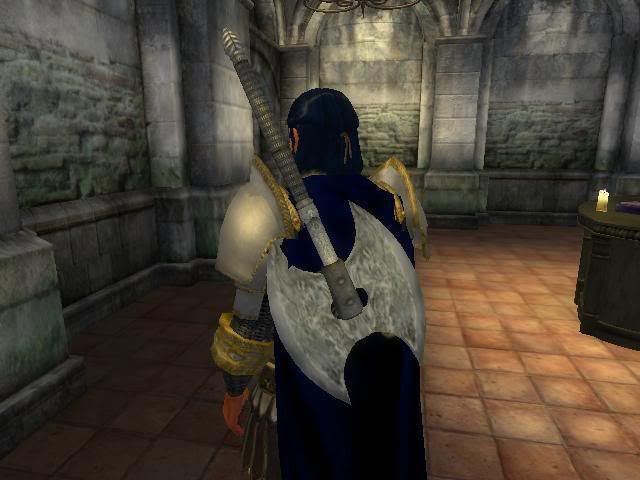
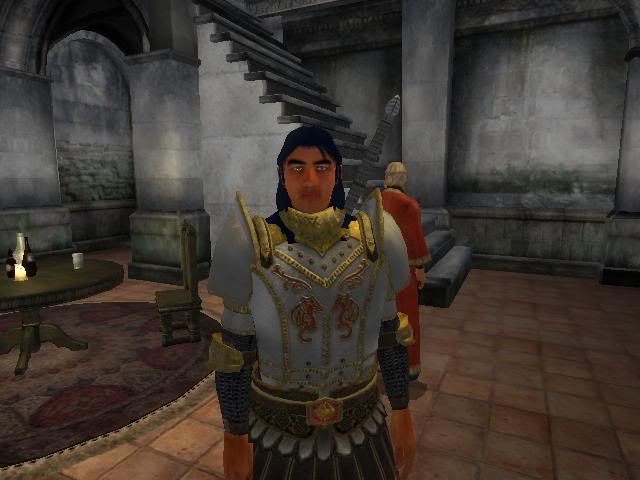
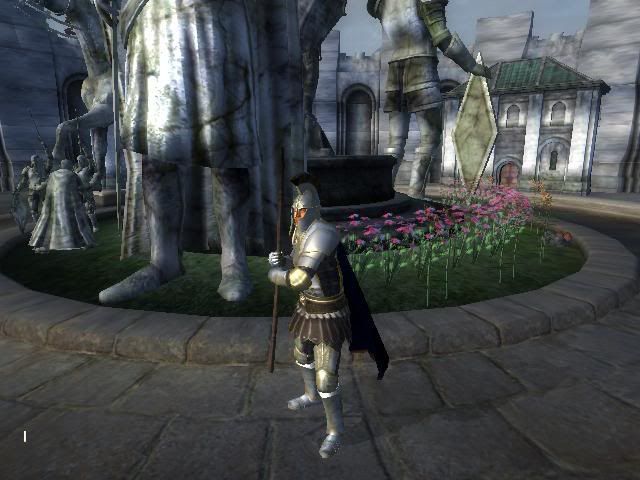
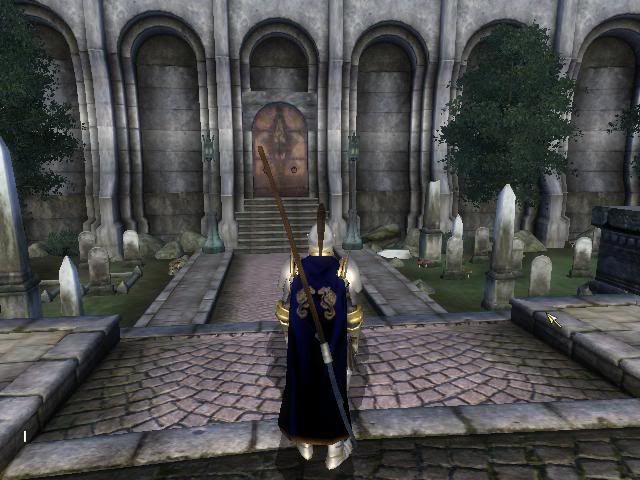
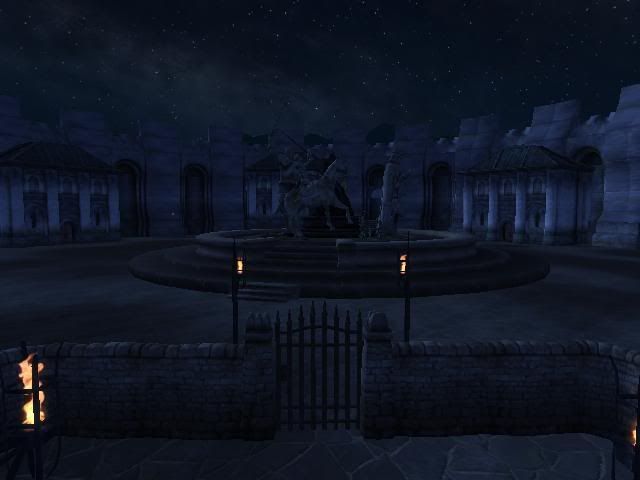
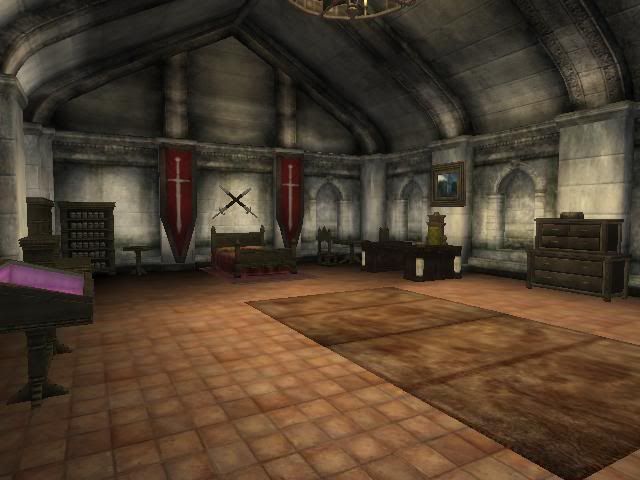
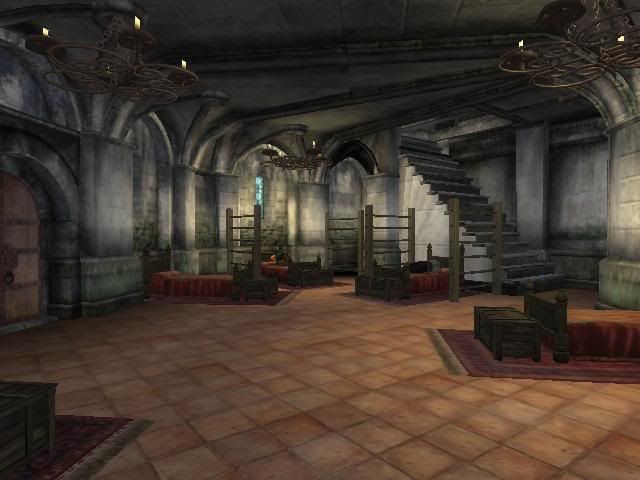
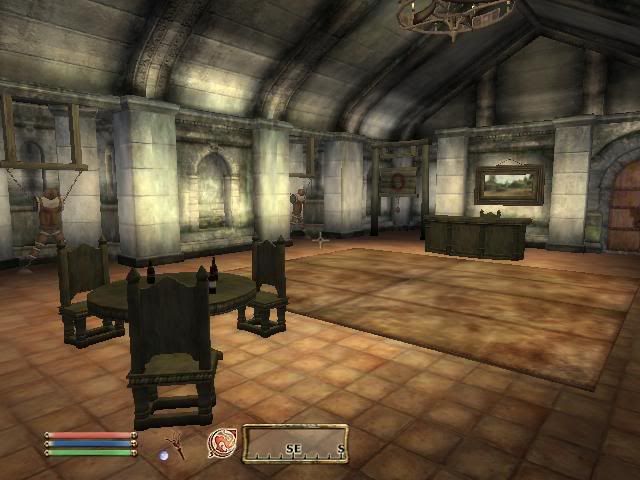
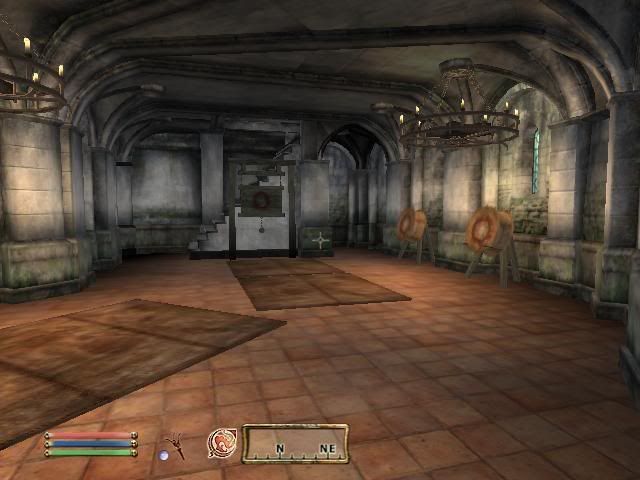
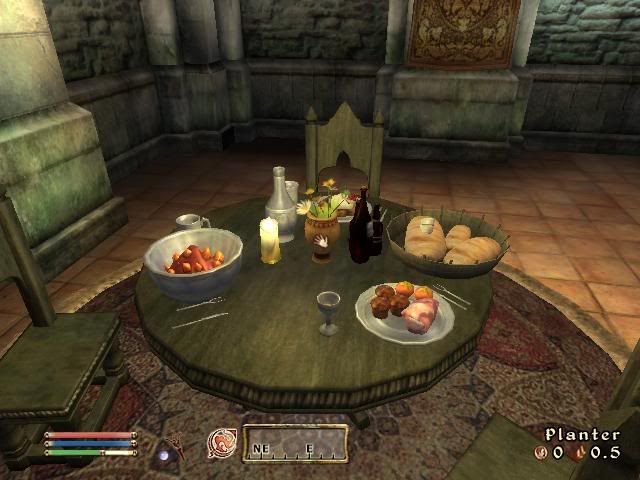
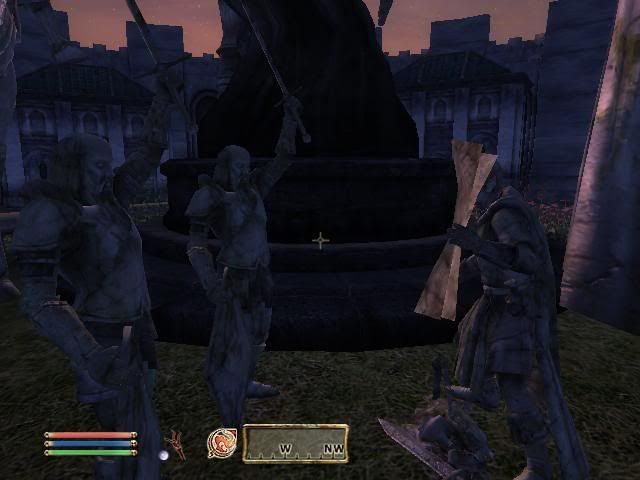
I am currently designing a mod for Oblivion which was made by Bethesda Softworks and thought I would share it with you.
Here is the original post but I would like your opinions and ideas about it and what you think from a commnity and professional perspective.
It's still under production. Here are some screenshots and links to movies.
== SCREENS ==
http://i121.photobucket.com/albums/o217/AgentBuddy/LegionModPhotos/Doub… Double Sided Silver Axe
http://i121.photobucket.com/albums/o217/AgentBuddy/LegionModPhotos/TalB… Tal Benoram - Imperial Legion Head Soldier
http://i121.photobucket.com/albums/o217/AgentBuddy/LegionModPhotos/Quar… Quarterstaffs - Training or combat this weapon rocks! :P
http://i121.photobucket.com/albums/o217/AgentBuddy/LegionModPhotos/Spea… Spears - Best used for charging into comat
http://i121.photobucket.com/albums/o217/AgentBuddy/LegionModPhotos/Outs… Outside view from Prison
http://i121.photobucket.com/albums/o217/AgentBuddy/LegionModPhotos/Upda… Knight of The Imperial Dragon's Quarters
http://i121.photobucket.com/albums/o217/AgentBuddy/LegionModPhotos/Slee… Sleepy Legionaiires
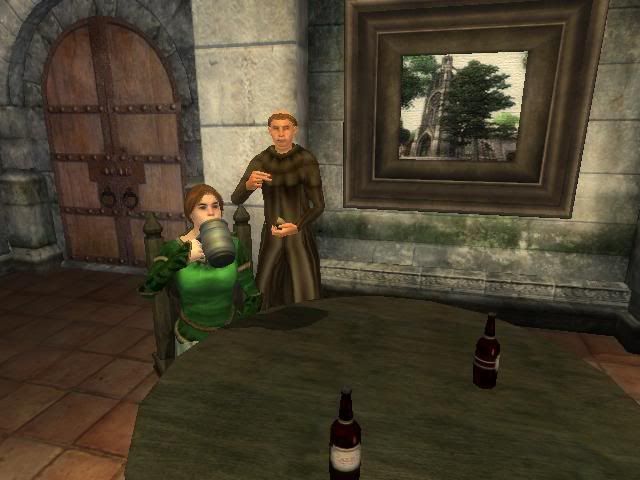
http://i121.photobucket.com/albums/o217/AgentBuddy/LegionModPhotos/Drin… Drinks for Everyone!
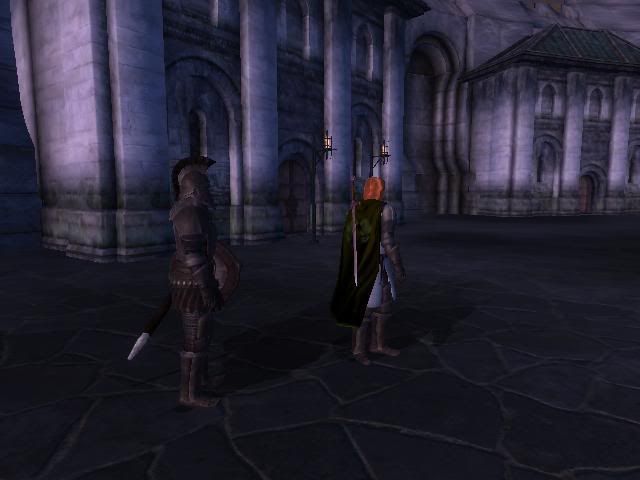
http://i121.photobucket.com/albums/o217/AgentBuddy/LegionModPhotos/Comm… Commaning Legionaiire on Patrol - Knight Errant
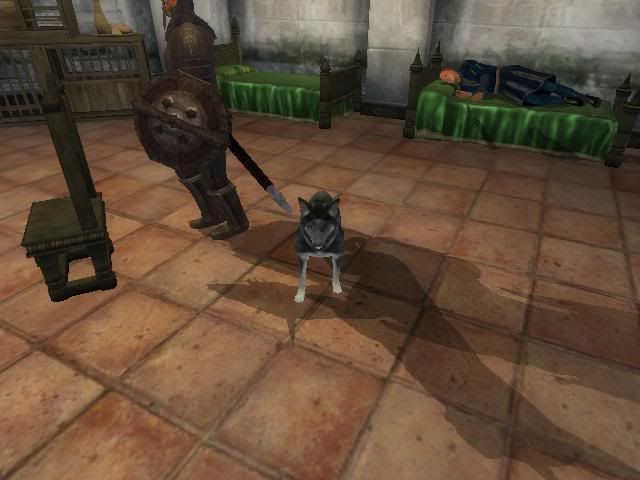
http://i121.photobucket.com/albums/o217/AgentBuddy/LegionModPhotos/Legi… Legion Guard Dog
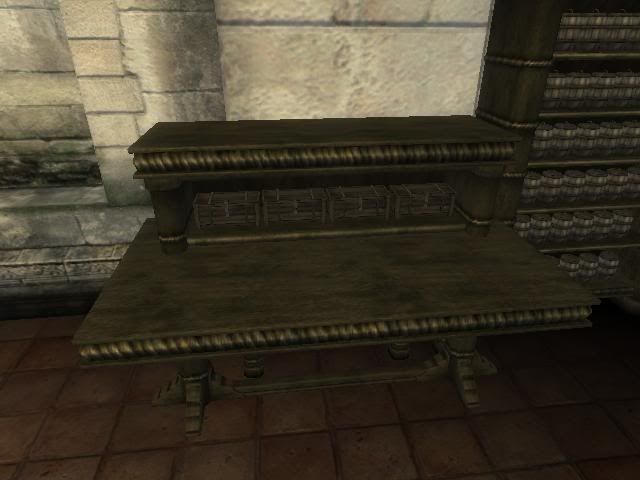
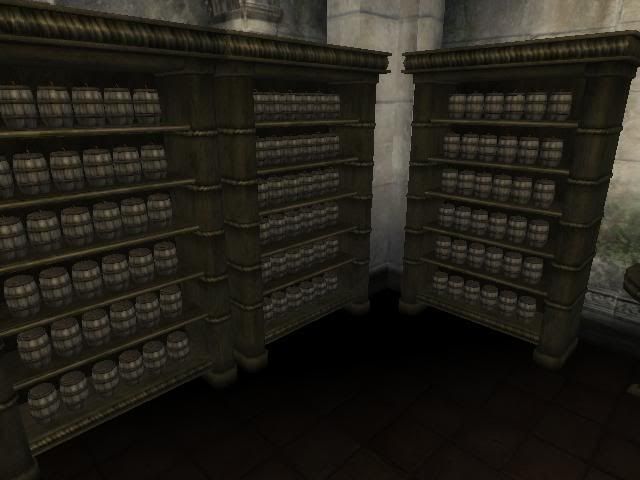
http://i121.photobucket.com/albums/o217/AgentBuddy/LegionModPhotos/Apar… Alchemy Apparatus Storage and Workbench
http://i121.photobucket.com/albums/o217/AgentBuddy/LegionModPhotos/Alch… Alchemy Storage
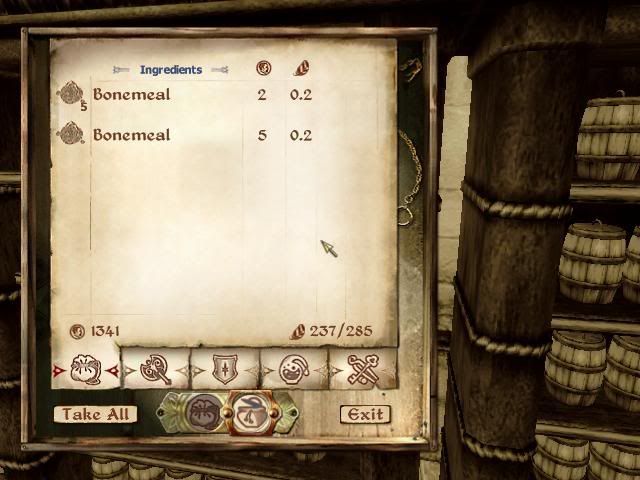
http://i121.photobucket.com/albums/o217/AgentBuddy/LegionModPhotos/Stor… Alchemy Storage Menu
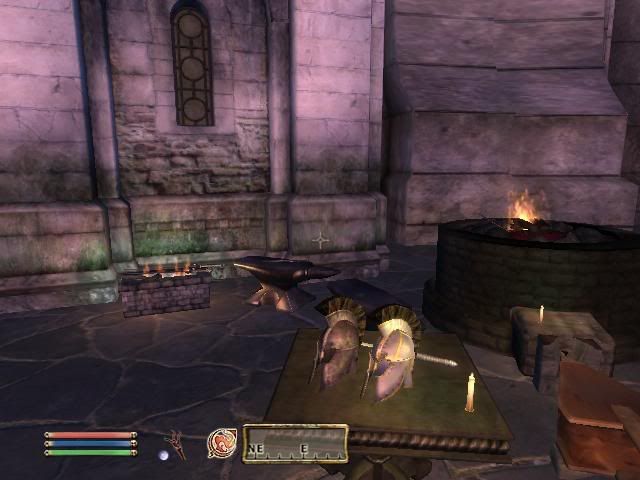
http://i121.photobucket.com/albums/o217/AgentBuddy/LegionModPhotos/Weap… Weapons & Armour Smith
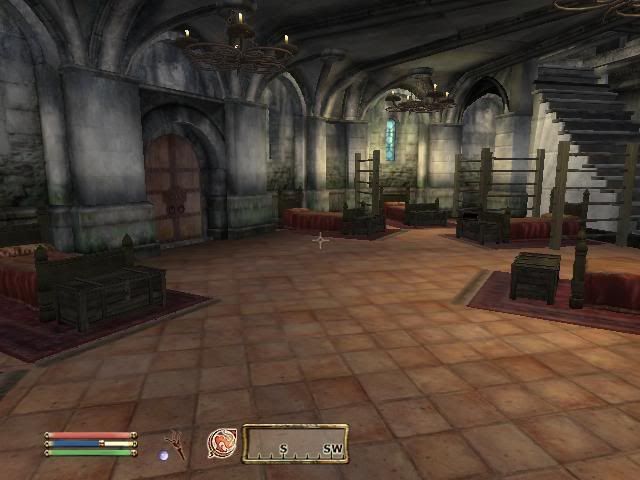
http://i121.photobucket.com/albums/o217/AgentBuddy/LegionModPhotos/Upst… Legion Sleeping Quarters
http://i121.photobucket.com/albums/o217/AgentBuddy/LegionModPhotos/Trai… Upstairs Training Room
http://i121.photobucket.com/albums/o217/AgentBuddy/LegionModPhotos/Trai… Training Room
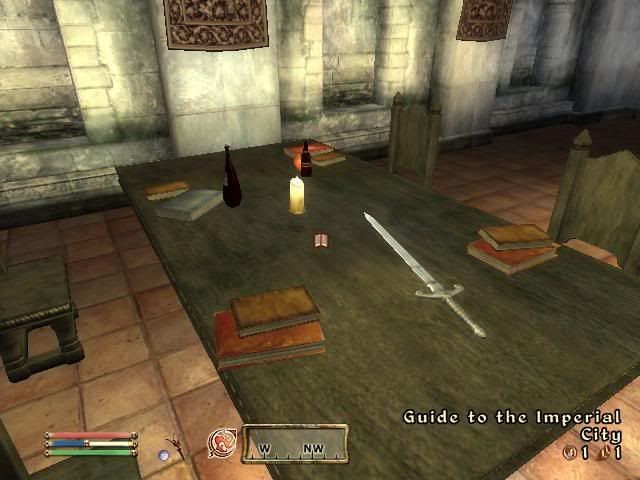
http://i121.photobucket.com/albums/o217/AgentBuddy/LegionModPhotos/Mast… Masters House Table
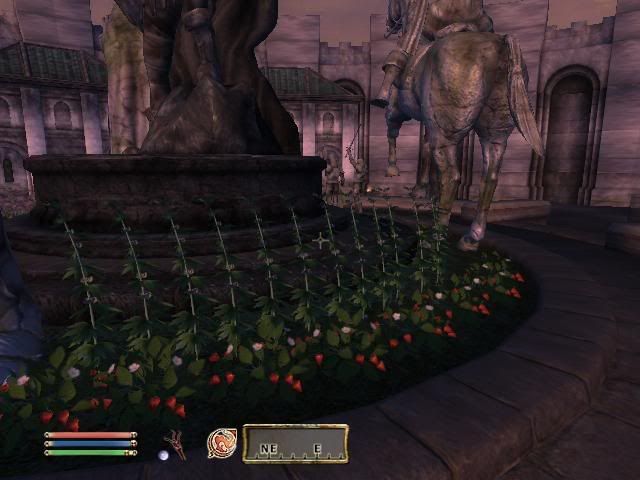
http://i121.photobucket.com/albums/o217/AgentBuddy/LegionModPhotos/Legi… Memorial Garden Statues
http://i121.photobucket.com/albums/o217/AgentBuddy/LegionModPhotos/Legi… Legion Memorial Gardens
http://i121.photobucket.com/albums/o217/AgentBuddy/LegionModPhotos/Legi… Legion Bedrooms
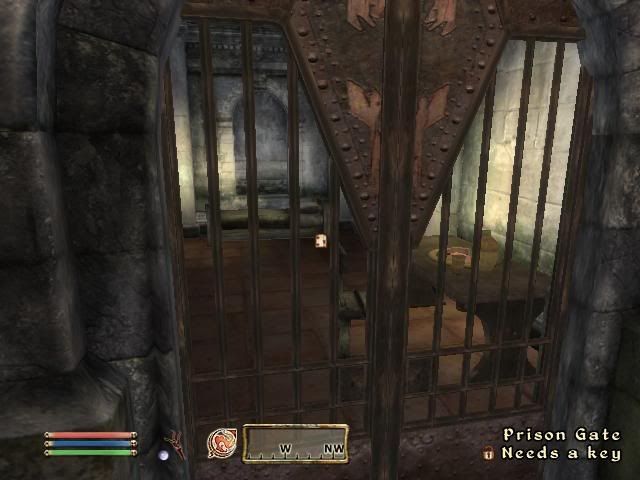
http://i121.photobucket.com/albums/o217/AgentBuddy/LegionModPhotos/Jail… Jail Cell
== MOVIES ==
http://www.youtube.com/watch?v=4o2gf7jJhYs - Trailer 1
http://www.youtube.com/watch?v=u_slixnyh7Q - Trailer 2
== WEB LINKS ==
http://www.geocities.com/ImperialLegionFaction
== INTERVIEW ==
Yes, I got interviewed :P
http://au.gamespot.com/pages/unions/read_article.php?topic_id=25726034&…
What do you guys think?
It's almost 50% complete.
- Logam (Chris)
Hey guys, I'm currently looking for a junior animator position so I've been working on my reel. Hope you guys like it: http://www.youtube.com/watch?v=e1YfjcFIRP8
Hello all.
Im posting to to start my sketch book, i am going to try and do at least 1 sketch everyday along with some study to improve my drawing -> painting (yet to purchase a tablet).
Im currently studying architecture but a more fantastical liberal working environment of illustration and concept art seems alot more exciting. But the goal is to see if i can improve to a stage where i have a decent folio and confidence in understanding of form, dynamism, colour theory and one of my biggest interest lighting and shading. (Biggest interest might not be the right phrase - maybe biggest most daunting task to one day understand and replicate.)
I have received some advice previously from the generous Sumeans frequenting the forums as to what are good places to start: the loomis books, life drawing and i have over the past 2 years caught glimpses of some of the gnomon workshop dvd's on concept art and environment sketching.
Maybe thats enough rambling to begin with, i have made a post and now there is documented evidence of my commitment (cant turn back now).
Heres hoping i can do something to even half the degree that EtaCarinae managed to do and you might see some improvement in me along the way.
Regards
Petebboyc3p02007-08-20 21:08:31
while studying architecture i kept drawing implements and sketch book on hand perminantly and would draw while waiting on public transport/ in library looking at reference or when when looking at buildings. not carefull/pretty drawings, but records of form and concept....
ended up with over 30 sketch books fool of little drawings, was quite a useful habit for a while (as a programmer now, just have not pads filled with class interfaces and dance choreographies, but life is change)
if you miss a day, don't give up
so i revived my old project called "MetallHell"... it was a mod for Battlefield 2... but i think that there enough features to become separate game.. and I start making game ;) here some stuff from project...
soldiers..
this is WIP guys.. i will improve them soon
robomaniac2007-08-18 16:10:23
here is finished main hero of game designed by me ....
concept: - me
modeling: - me
texturing: - me
animation:- n/a
rigging: - n/a
tools:
maya, photoshop
elapsed time - 20hrs
robomaniac2007-08-18 13:01:55
helllooo nurse,
that is really good, and wow, 20hours, that is some fast work.
i do admit to being a profesional pervert, so would prefer to see the suit streched between the breasts rather than skin tight (but that makes it much more difficult to reuse the model for other textures)
the shadow under the edge of the rib cage is possibly a bit too dark, though if you start adding really subtle shading, a bit of a smudge for the conture change of the belly button and vocal box/ collar bones could help hint at more form detail than is in the model.
people seem to like buttocks which are spherical, however they have a divot towards to side if not even a bit tappered towards the top (just a thought/ then again have met a few latino girls where the did look spherical..)
guess it is part of the beauty abstraction of this medium to make the knees thinner than realistic (width in left-right) (not a complaint, helps empisise curves and distance of medium needs some exsauration)
meet a girl vaugly this shape in sydney while there for salsa congress, an instructor from NZ, her breasts where not quite as high (going for a 'implanted' look?) and a tiny bit more of a tummy, but this is still anotomically possible
head/ bicepts seem a bit small for neck/ rest of proportions, but not certain if changing that will make it look better though (though neck does seem quite wide?)
hmmn, recognise the problems with getting a texture to fit accross that much realestate.
nice workdavidcoen2007-08-20 06:20:06
Ride the Fury is a 2D physics based 4 player copetative co-op game, rendered in 3D on the XBox 360 using Microsofts XNA.
Oh I almost forgot to mention the customisable aviatar photos, you can get your friends to dress up like weirdos and take pictures of them!
I've got a code blog that will have more updates for those that are interested, I'll use this thread for highlights only.
It's been a solo effort so far, if you think you've got something to offer the project let me know?BrownBot2007-08-16 17:11:40
i am newbie here and like to show some of the my sketches here
here is other stuff done by me
http://conceptart.org/forums/showthread.php?t=48861&page=23&highlight=robomaniac%27s+universe
robomaniac2007-08-15 05:32:35
That's some nice work!
I think I like the really rough negative space one the most, you obviously use a tablet... I've got a nice big wacom myself.
I've recently subscribed to this imagineFX mag, a bit pricey but I've found it great.
Keep it up!
oppsie, ment to include a design query as to the purpose for these robots, seem to be a anotomical translation rather than a functional recration of human attributes. (ie, they have 10 digit hands? where as a robot may just have the minimum functional specification to be able to do multi purpose tasks, either interchangable limbs/ hands or less digits, as cost/ production costs conflict with huminisation....) just a thought
oh my god, forgot to update this one ... posted as alwayas at sumea forums
some latest stuff here:
i am really dont like thread and editing system of this forum, this is my latest post here...
Hi all Thought I would put up my current project for you guys to crit on. It was gonna be for the World of Warcraft Art Contest but I have been busy so didn't have it finished in time.
Still got alot of work to do on it as you can see =).
WhiteFalcon2007-08-15 00:31:03
cool, keep posting progress for us.
Just a detail on the wings, they look like they are parallel to the viewing plane (ie. like we are viewing them from the top down) rather than the trailing edge receding into the distance. The eagle head is 'protruding' nicely, would be great if the wings could aid with the illusion of depth equally well.
Just noticed the alpha shadow tracing and the volume light fucked up the transparency on the small tentacles in the renders so you can slightly see the planes. If I remove the volumetric light effect it's fine though, so go figure. I don't really know how to fix it other than maybe moving the lights and tweaking the density of the lighting.
Dane Brennand - Texture Artist